
Sterilization vs Pasteurization: Which Does Your Mushroom Substrate Need?
When you start growing mushrooms at home, two terms come up constantly: pasteurization and sterilization. Both use heat to prepare growing substrates, but they do different jobs. Knowing when to use each can save time, energy, and a lot of frustration.
The easiest way to understand the difference is to look at what you are growing on. A bag of chopped straw for oyster mushrooms is not the same as a nutrient rich hardwood sawdust block supplemented with wheat bran or nutrient rich Agar dish. They may all grow mushrooms, but they present different challenges for controlling competing microorganisms.
Let’s break down the methods, when to use them, and how they fit into a home cultivation setup.
What is pasteurization?
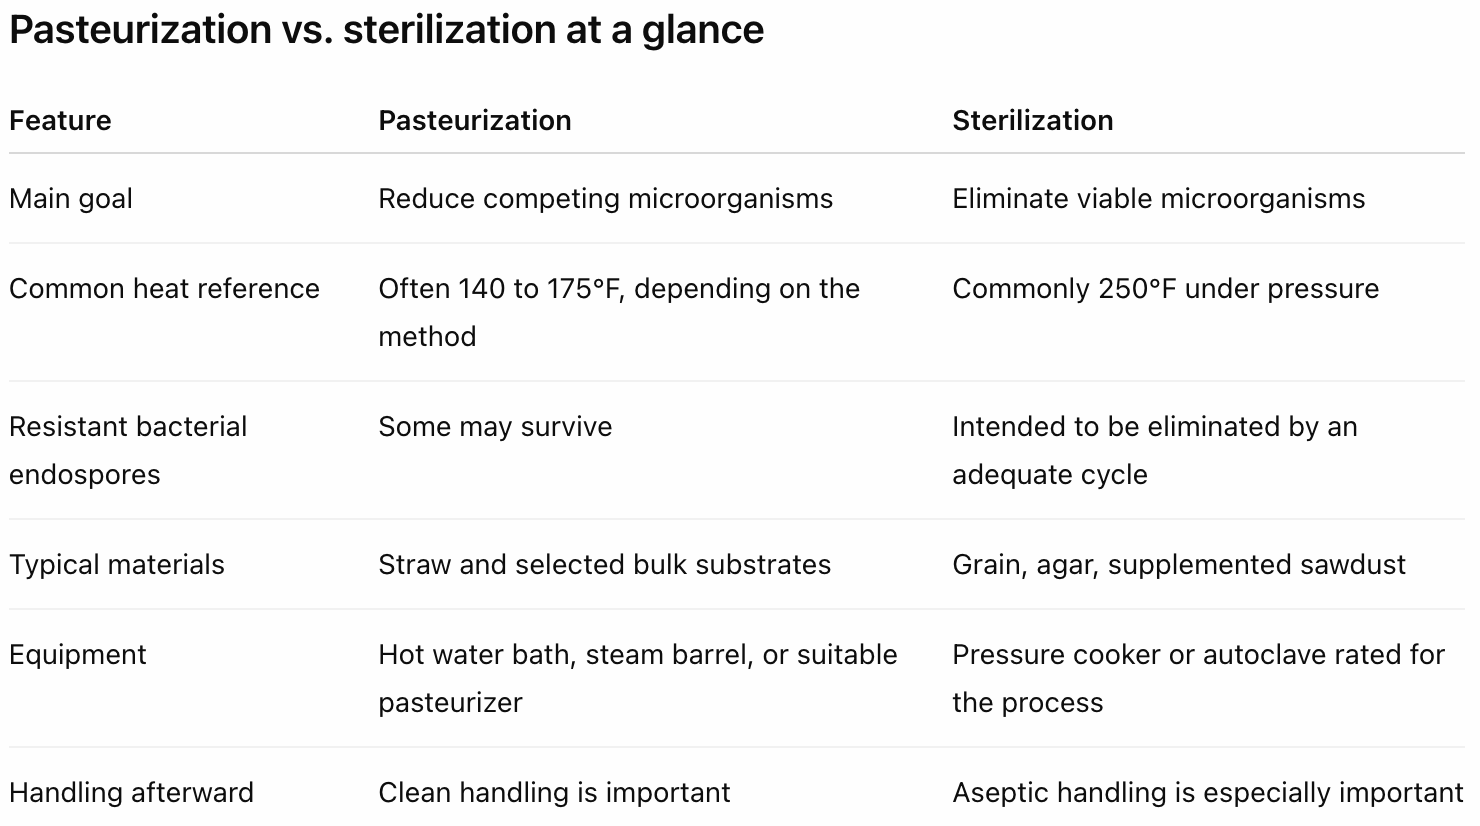
Pasteurization is a heat treatment that reduces many competing microorganisms without aiming to eliminate every viable organism in the substrate.
In mushroom cultivation, it is commonly used for materials such as straw, or low nutrient wood substrates. The goal is to reduce competition enough for an actively growing mushroom culture to establish itself and colonize the material.
Some heat tolerant microorganisms may survive pasteurization. Depending on the substrate and treatment, they can be relatively uncompetitive with the cultivated mushroom, although we should not assume that every surviving microorganism is beneficial.
Pasteurization is about reducing competition, not creating a sterile starting point.
What is sterilization?
Sterilization aims to eliminate all viable microorganisms, including resistant bacterial endospores, throughout the treated material.
For mushroom cultivation, this is usually achieved with pressurized steam. A common reference condition is approximately 250°F (121°C) at 15 psi gauge pressure, with sufficient exposure time for heat to reach the coldest part of the load. (25 minutes for Liquids, 90 minutes Grain Spawn, 2.5-3 hours for substrate all at 15PSI, 250f))
Sterilization is particularly useful for grain spawn, agar or liquid culture media. These materials contain nutrients that can support contaminants as readily as they support the mushroom we want to grow. Once we grow established healthy mycelium of our choosing on these mediums we can spread them into pasteurized substrates.
Once sterilized, the substrate must be handled carefully. It no longer has the same surviving microbial population that might otherwise compete with incoming contaminants, so clean inoculation practices become especially important. These highly nutritious substrates are awaiting anything to land and grow on them. Some species are more aggressive and can handle more than others but Sterile substrates should be inoculated in sterile conditions.
Pasteurized substrates retain some heat tolerant microorganisms, while sterilized substrates are intended to eliminate viable microorganisms throughout the treated material. Neither method guarantees successful cultivation. Pasteurized substrates can sometimes be inoculated using less stringent handling practices than sterile substrates, but clean tools, healthy spawn, and careful handling remain important.
When should you pasteurize?
Pasteurization is a common choice for relatively low nutrient agricultural materials, especially straw used to grow oyster mushrooms.
Keeping straw at about 165°F for one to two hours, boiling in a big barrel then drip dry and then inoculate!
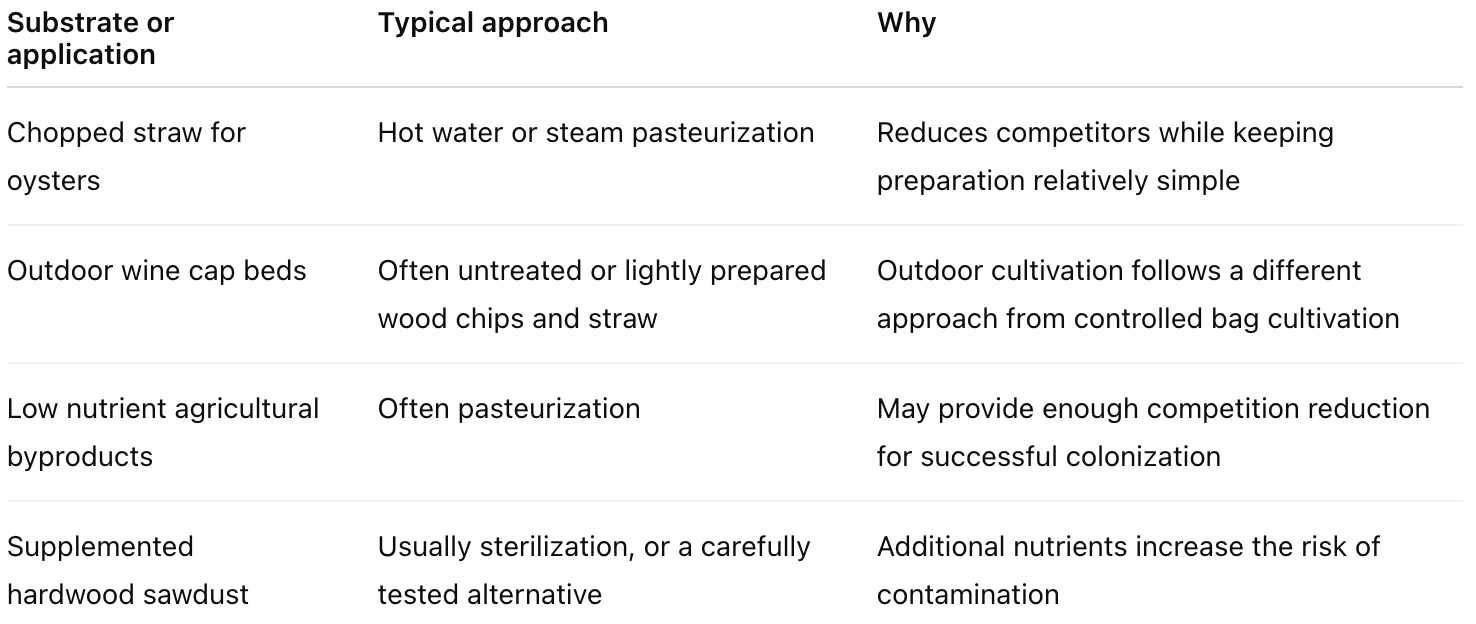
Oyster mushrooms are adaptable, but the species alone does not determine the treatment. Substrate composition matters just as much.
Plain straw and straw supplemented with substantial quantities of wheat bran are different growing environments. Adding a nitrogen rich supplement can make the substrate more favorable to competing organisms, so the treatment that works for plain straw may not work for the supplemented version.
How to pasteurize a substrate
One common method is hot water pasteurization.
Prepare the material. Chop straw or break up the substrate so heat and water can reach it evenly.
Heat the substrate. For straw, a common method is to maintain approximately 160 to 175°F, depending on the protocol.
Monitor the temperature. Measure the substrate itself where possible, not only the surrounding water.
Hold the treatment temperature. A common straw treatment is around one to two hours, with timing based on the substrate reaching the target temperature.
Drain and cool. Allow excess water to drain and let the material cool before inoculation.
Inoculate with healthy spawn. Use clean tools and handling practices, and distribute the spawn evenly.
Moisture is important. The substrate should be hydrated without being waterlogged. For many loose materials, a firm squeeze should release only a few drops, although the ideal moisture content varies by substrate.
Remember that the center of a dense load heats more slowly than the surrounding water. A thermometer reading in the bath does not necessarily tell you how much heat the center of the substrate has received.
When should you sterilize?
Sterilization is generally the more dependable choice for materials with readily available nutrients, especially when they will be used in controlled cultivation systems.
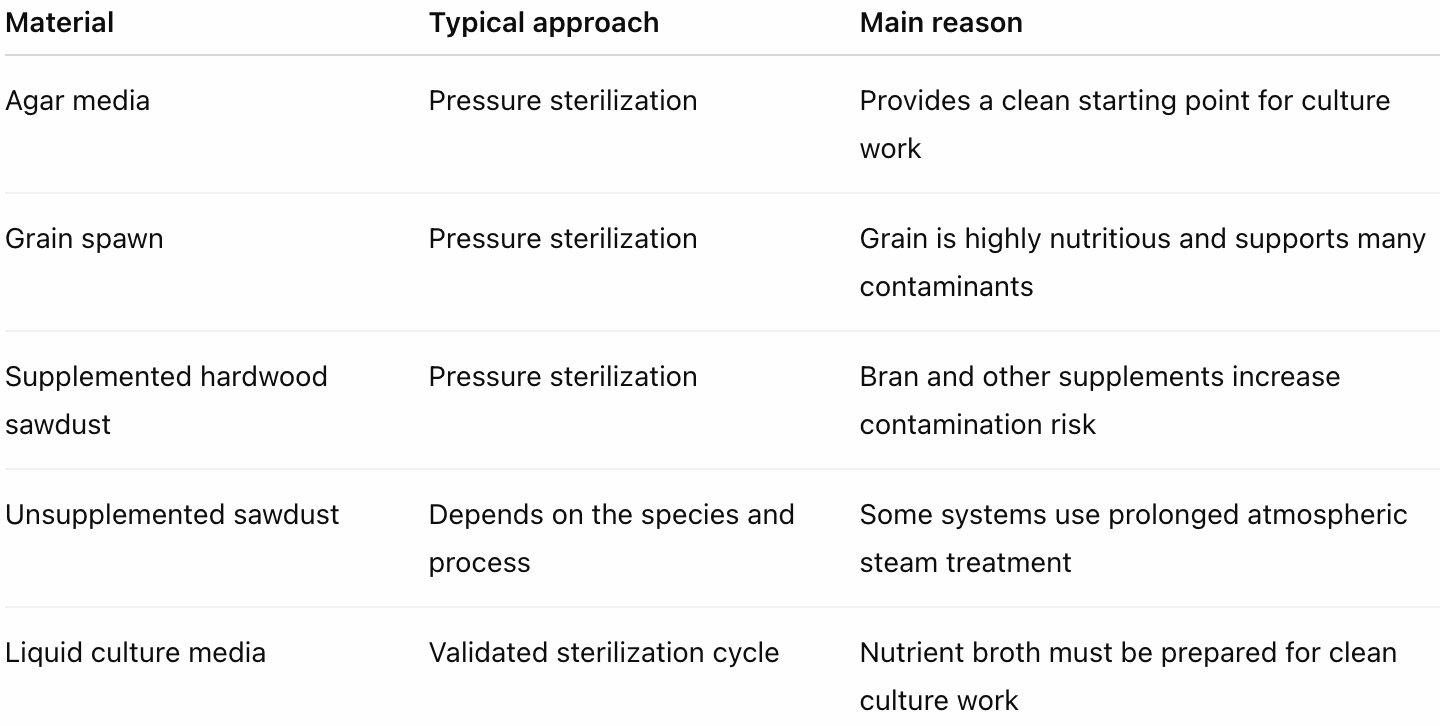
For home cultivators, a pressure cooker or pressure sterilizer rated for the intended use is often the practical option. Follow the equipment instructions and a substrate specific protocol.
How to sterilize a substrate
Prepare the recipe. Hydrate the grain or mix the sawdust, bran, and water according to the formula.
Load suitable containers. Use jars or filter patch bags designed for pressure sterilization.
Follow the equipment instructions. Allow the unit to vent as directed and reach its operating pressure.
Maintain the required conditions. A common reference is 250°F at 15 psi gauge pressure.
Allow enough exposure time. The required cycle depends on the bag size, substrate density, load configuration, and equipment. A cycle suitable for small jars may not be sufficient for large blocks.
Cool safely. Allow the pressure to return to zero and let the substrate cool thoroughly.
Inoculate aseptically. Keep the substrate protected from contaminants while introducing clean spawn.
Reaching 250°F does not mean the whole load is instantly sterilized. Heat must penetrate the substrate, and the coldest point must receive adequate exposure. This is particularly important with large, densely packed sawdust blocks.
What about super pasteurization?
There is another method worth knowing about, especially if you are experimenting with supplemented sawdust and do not have access to a large autoclave.
In Growing Gourmet and Medicinal Mushrooms, Paul Stamets describes a prolonged atmospheric steam treatment he calls super pasteurization, also referred to as atmospheric sterilization. The process brings the coolest part of the substrate to approximately 190°F and then maintains that temperature for at least 12 hours. He notes that longer treatment may be needed depending on the substrate and load.
This is not the same as ordinary straw pasteurization. It is a prolonged high temperature treatment intended to reduce competitors in supplemented sawdust without using the temperatures and pressures of conventional autoclave sterilization.
It also should not be confused with true sterilization. Resistant organisms, including some bacterial endospores, may survive atmospheric steam treatment. Published cultivation guidance also notes that yields from super pasteurized sawdust can differ from those produced using pressure sterilization.
A Swamp Fox Fungi experience to note: 80/20 oyster substrate
In my own cultivation work, I have used an 80/20 hardwood sawdust and wheat bran substrate for oysters, with a cook time of about 5 hours at 190°F., then cooled infront of my flowhood. This requires vigorous cultures but far more prone to contaminates and blotch.
That puts my process in an interesting category. It is hotter and longer than conventional straw pasteurization, and it resembles the general idea behind prolonged atmospheric steam treatment. However, Stamets's described method calls for at least 12 hours after the coolest part of the substrate reaches approximately 190°F. My five hour process does not meet that published time specification, so I would not call it a validated super pasteurization protocol.
For now, I would describe it as an experimental high temperature atmospheric heat treatment. Whether it reliably prepares the substrate depends on factors including the actual temperature inside the bags, how long the center remains at that temperature, bag size, moisture, and contamination rates across repeated batches.
This is exactly the kind of question worth testing rather than assuming we already know the answer. If the method consistently produces clean, well colonized blocks, that is useful practical evidence for the conditions under which it works. It does not, by itself, establish that the substrate was sterile or that the method will transfer to other bag sizes, recipes, or species.
What about lime pasteurization?
You may also encounter cold lime treatment, which uses hydrated lime to raise the substrate's pH and suppress many competing organisms.
Despite the name, this is not heat pasteurization and it is not equivalent to pressure sterilization. Its effectiveness depends on the material, the pH reached, exposure conditions, and the organisms present. It can be useful in certain systems, but it should not be treated as a universal substitute for sterilizing grain or heavily supplemented sawdust.
Particularly useful in Oyster Mushrooms cultivated on Straw! Low Tech, Low Hurdles to Start!
For this use HYDRATED LIME (aka pickling lime or builders lime, Calcium Hydroxide! DO NOT USE Calcium Carbonate or limestone/chalk!
Use at 2 grams of Lime per 1 liter of water.
PREPARE CAUTIOUSLY WITH PPE AND GLOVES AND SUCH! At this high pH the lime is caustic and can cause eye irritation or skin irritation/issues
The takeaway: match the method to the material
Pasteurization is often a good fit for straw and selected lower nutrient substrates. Pressure sterilization is generally the safer starting point for grain spawn, agar, and nutrient rich supplemented sawdust.
Prolonged atmospheric steam treatment offers another approach, but its success depends on temperature throughout the substrate, exposure time, and the exact process. Our own experiments can help refine these methods, but it is important to distinguish a process that has worked in our setup from one that has been validated for general use.
As you experiment, keep records of your substrate recipe, moisture, bag size, core temperature, exposure time, contamination rate, and yield. Those details help turn a promising technique into a repeatable process.
Keep learning, keep experimenting, and keep myceliating tomorrow.
Looking for more? Check out this Video How I do each for substrates in different vessels!
Swamp Fox Fungi
