
Wine Cap Mushrooms
Quick Start Summary:
Wine Cap mushrooms, also called King Stropharia or Garden Giants, are one of the friendliest outdoor mushrooms to grow because they work with materials you probably already have and understand with wood chips, straw, leaves, cardboard, water, shade, and soil.
You do not need a sterile lab, pressure cooker, fruiting tent, or a bunch of fancy equipment. When you plant Wine Cap spawn, you are adding living mycelium into a fresh mulch bed, kind of like adding sourdough starter to flour or compost microbes to a pile. The mycelium spreads through the wood chips and straw, breaks them down, holds moisture, and helps turn rough mulch into richer organic matter over time. Wine Caps are not mycorrhizal, so they are not directly plugging into plant roots like some fungi do, but they still make excellent garden companions because they live right where mulch, roots, worms, insects, bacteria, and soil all meet. They are decomposers, soil helpers, outdoor educators, and edible mushrooms all in one.
Build the bed 4–6 inches deep, keep it moist but not swampy, give it shade or partial shade, and let the mycelium do its work. In the right conditions, especially after rain or cooler wet weather, you may see large burgundy-to-tan mushrooms pushing up through the mulch. Start simple, keep the bed fed, and treat it like a living part of the garden.
What Are Wine Cap Mushrooms?
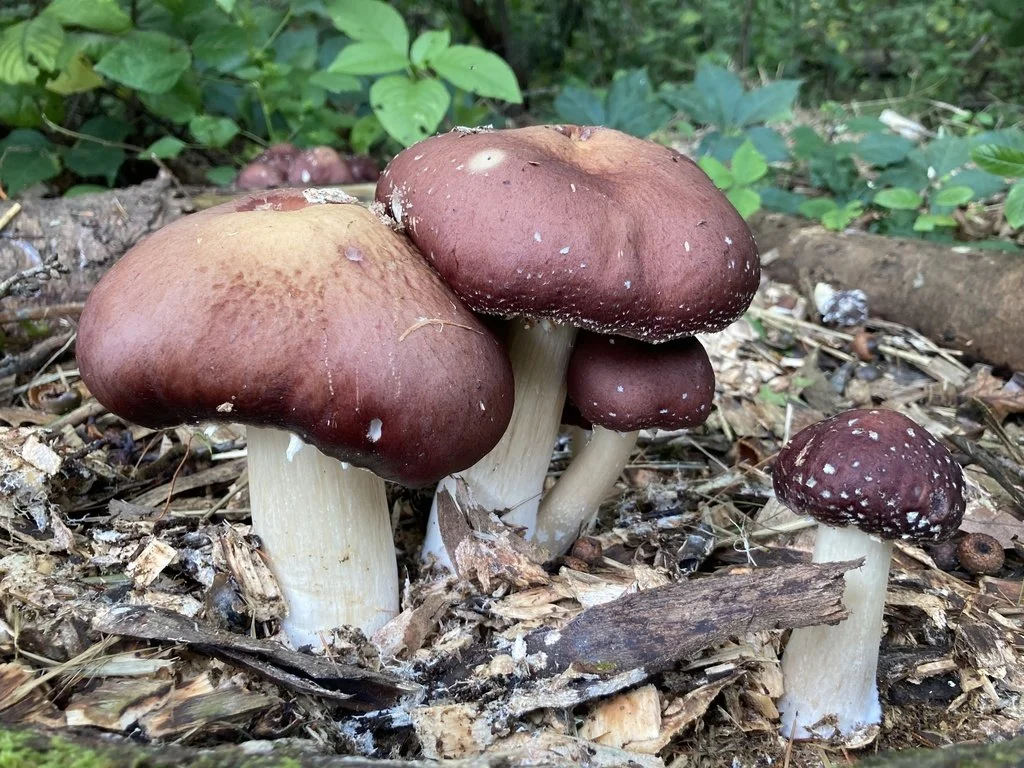
Wine Caps are the edible mushroom species Stropharia rugosoannulata. They are often called Wine Caps, King Stropharia, or Garden Giants because young caps can have a deep reddish wine color, and mature mushrooms can get surprisingly large.They are one of my favorite beginner mushrooms because they do not ask you to become a lab technician on day one. You are not sterilizing grain, building a fruiting room, or dialing in humidity controllers. You are building a little fungal garden bed outside and letting the mushroom do what it naturally wants to do: move through woody organic matter.If you already understand mulching a garden, composting leaves, or keeping a raised bed watered, you are already halfway there!
The mushroom you harvest is just the visible fruit. The real work is happening underneath. The white, threadlike growth moving through the chips is the mycelium. That mycelium is the body of the fungus. The mushroom is more like the apple on an apple tree. So when you plant Wine Cap spawn, you are not really “planting mushrooms” the way you plant tomato seeds. You are introducing a living fungal network into a bed of food.
What Is Wine Cap Spawn?
Spawn is living mycelium growing on a carrier material. In simple terms, it is the starter culture. A good comparison is sourdough. If you mix flour and water together, you just have flour and water. But when you add sourdough starter, you introduce a living culture that wakes the whole thing up. Wine Cap spawn works the same way! The wood chips and straw are the food. The spawn is the living culture that gets the process started. Once the spawn touches moist wood chips, straw, cardboard, or leaf litter, the mycelium begins to explore. It pushes outward, connects pieces of material together, and slowly starts changing that mulch from just wood chips sitting on the ground into a living fungal bed.
That is the whole game: food, moisture, air, and time.
What Do Wine Caps Eat?
Wine Caps are decomposers. They feed on dead organic material, especially woody and straw-like plant matter. That makes them a great fit for gardens, pathways, orchards, perennial beds, and mulched edges. Good materials include: Hardwood chips, Mixed arborist chips, Straw or chopped straw, Aged leaves, Untreated cardboard, Garden mulch, Small twigs and woody debris and Partially broken-down plant matter. My favorite beginner mix is wood chips plus straw.Wood chips are the long-term food. They hold structure and keep the bed going longer. Straw is the easy snack. It is softer, quicker to colonize, and helps the mycelium move through the bed faster. Together, they make a nice balance. Avoid dyed mulch, pressure-treated wood, pesticide-treated material, salty compost, chemically contaminated chips, or anything that smells like fuel, paint, or trash.
A healthy Wine Cap bed should smell earthy, sweet woody, and alive. If it smells sour, rotten, or nasty, something is off.
How Wine Caps Work With Soil:
This is where Wine Caps become more than just an edible mushroom. They live in the mulch layer, right at the meeting place between wood, soil, roots, water, insects, worms, bacteria, and other fungi. That mulch-soil zone is one of the busiest parts of the garden. Wine Caps are not mycorrhizal. They are not directly attaching to plant roots like arbuscular mycorrhizal fungi do. So I would not describe them as “feeding your plants directly.” But they still support the garden in a very real way.They help break down tough carbon-rich materials. They soften wood chips. They help turn mulch into darker organic matter. They create habitat for other soil organisms. They help keep the ground covered and moist. Over time, the bed becomes less like a pile of mulch and more like a living layer of soil-building activity. Think of Wine Caps as the mulch crew. They are not the tomato plant. They are not the fertilizer bag. They are the crew in the background breaking down material, keeping the soil covered, and helping the whole system cycle forward and in doing so provide you with food and improved conditions! Research on Stropharia rugosoannulata cultivation has also shown effects on soil nutrients and bacterial communities, with spent mushroom material playing an important role in those soil changes.
Wine Caps and Plants
Wine Caps can be grown near many garden plants because they are mainly interested in the dead woody material around the plants, not the living plant itself.
Good places to tuck a Wine Cap bed include: Along garden pathways, Around raised beds, Under fruit trees, Near berry bushes, Around perennial herbs, Between vegetable rows, Along shady fence lines, Near compost areas, In food forest-style plantings, Around ornamental or native plant beds.
In a hot place like Jacksonville, I would look for morning sun and afternoon shade. Wine Caps can handle more light than some mushrooms, but the bed cannot dry out completely and still perform well. If you are walking around your yard wondering where to put them, ask yourself: “Where does mulch stay damp the longest?” That is usually a good place to start.
A Fun Wine Cap Biology Note
Wine Caps have a wild little trick worth knowing about.Stropharia rugosoannulata can produce spiky cells called acanthocytes. Studies have shown these structures can help immobilize and attack nematodes, which are tiny worm-like organisms that live in soil. That does not mean your Wine Cap bed is a guaranteed pest-control product. Soil is more complicated than that, and many nematodes are part of a healthy soil food web. But it does show that this mushroom is not just sitting there passively eating wood chips. It is interacting with the soil world around it. That is one of the coolest parts of fungi: the more you look, the less “simple” they become.
How to Build a Wine Cap Bed:
Here is the simple version I would show a friend in my yard.
What You Need
- Swamp Fox Fungi Wine Cap spawn
- Hardwood chips, straw, or both
- Cardboard (optional)
- Water
- A shady or partially shaded spot
- A rake, shovel, tote, bucket, or wheelbarrow (to move materials around)
Step 1: Pick Your Spot
Choose an area with soil contact. Wine Caps can grow in containers, but they really shine when they can work with the living ground below them. A beginner bed does not need to be perfect. A path, a corner of a garden, the edge of a raised bed, or a ring around a fruit tree can all work.
Step 2: Wet Your Materials
Dry wood chips are hard for mycelium to run through. Before you build the bed, get your chips and straw wet.They should feel damp like a wrung-out sponge. Not bone dry, but not sitting in a stinky puddle either.
Step 3: Add Cardboard (Optional)
Cardboard can help suppress weeds and hold moisture. Remove tape and plastic labels if you can. Lay it over the soil and soak it well.
Step 4: Start Layering
Add a few inches of moist wood chips or straw.Then break up your spawn and sprinkle it across the layer. You do not need to make it perfect. Just spread it around so the mycelium has many starting points. Now add more chips or straw. You are basically making a mushroom lasagna:mulch, spawn, mulch, spawn, mulch.
Step 5: Build to About 4–6 Inches Deep
A 4–6 inch bed is a good practical depth for most home growers. Too shallow and it dries out quickly. Too deep and it can get compacted or stay too wet if the material is heavy. You want the bed fluffy enough to breathe, but dense enough to hold moisture.
Step 6: Water It In
Give the bed a deep watering when you are done. This first watering matters. You want moisture throughout the bed, not just on the top.
Step 7: Cover and Let It Work
Finish with a top layer of straw, leaves, or chips to protect the bed. Then leave it alone more than you mess with it. You can gently peek under the chips after a couple weeks to look for white mycelium, but do not tear the bed apart every day checking on it. Mycelium likes patience.
How to Care for Your Wine Cap Bed
Your main job is moisture. If the bed dries out completely, growth can stall. If it stays soaked and airless, it can go sour. You are aiming for damp, earthy, and breathable. Water during dry spells. Add fresh chips, straw, or leaves as the bed breaks down. Keep it covered. Keep it fed.
Over time, the bed will shrink. That is not failure. That means the material is being digested and transformed. You can top it off with more wood chips or straw as needed. You can also move colonized chips into a new bed later, almost like dividing a perennial plant. Once you understand that, Wine Caps stop feeling like a one-time product and start feeling like a living garden culture.
When Will Mushrooms Show Up?
Wine Caps fruit when the bed is colonized, moist, and the weather lines up.Rain often helps. Cooler wet stretches often help. In many places, spring and fall are strong fruiting windows. In hot climates, the best flushes may show up when the bed has stayed moist and the weather backs off from extreme heat. Do not panic if you do not see mushrooms right away. This is outdoor cultivation, not a countertop grow kit. A Wine Cap bed is more like planting garlic, potatoes, or a fruit tree than pushing a button. You build the system, care for it, and let the season do some of the work. Sometimes they fruit fast. Sometimes they take months. The first flush often feels like the yard decided to surprise you.
Harvesting Wine Caps
Harvest Wine Caps when they are young to moderately mature. Young mushrooms usually have deeper burgundy caps. As they mature, the caps often fade toward tan or brown, flatten out, and the gills darken. Wine Caps typically have pale young gills that become grayish to purple-gray and eventually dark purple-brown as spores mature. Their spore print is dark purple-brown to purplish black. You can cut them at the base with a knife or gently twist and pull. After harvesting, tuck the mulch back into place.
!!!!!!******One important note: outdoor beds can grow surprise mushrooms too. Even if you planted Wine Cap spawn, do not eat every mushroom that appears in the bed unless you are confident it is actually a Wine Cap. Check the cap, gills, stem, ring, color, and growth location. When in doubt, leave it out. ******!!!!!!
Cook Wine Caps thoroughly before eating.
Why Grow Wine Caps?
Wine Caps are one of the best mushrooms for showing people how fungi actually fit into everyday life. They are food, but they are also soil education. They teach you that mushrooms are not separate from the garden. They are part of the garden’s engine. They break things down, move nutrients along, build relationships with the soil food web, and turn “waste” materials into something useful.
If oyster mushrooms are a great first indoor grow, Wine Caps are one of the best first outdoor grows. They are simple, useful, beautiful, and fun to check after a rain.
Start with one bed. Keep it moist. Feed it mulch. Watch what happens.
Myceliate Tomorrow — one bed, one chip, one mushroom at a time.
Keep Learning with Swamp Fox Fungi!
Download the Wine Cap Grow Guide PDF BELOW:
Save this guide, print it, or keep it with your spawn so you can reference it while building and maintaining your bed.
Have questions after planting? Want to show your bed, troubleshoot, or share photos when mushrooms pop up?
Join The Swamp, our Fungal Focused Discord Server, for growers, gardeners, and fungi-curious people learning together.
Need Help?
Reach out anytime:
Email: swampfoxfungi@gmail.com
Wine Cap Spawn Guide Here